ESP32-Radar: A Simple Yet Powerful Demo Project
ESP32 & Hardware
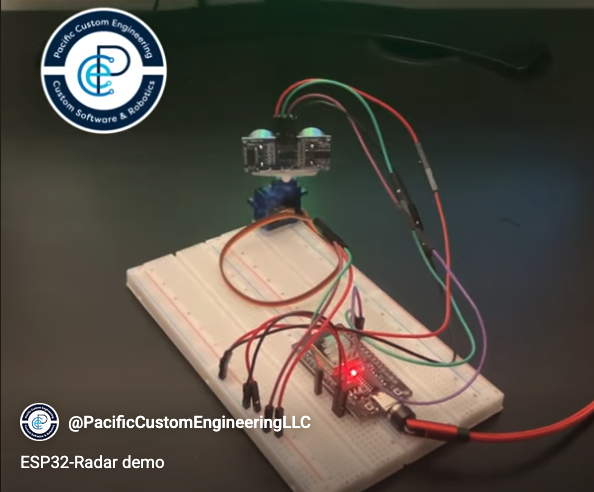
Project Overview
The ESP32-Radar combines an HC-SR04 ultrasonic sensor with our ESP32-WROOM-32 development board to create a basic radar that measures distances in real-time.
The data is processed by the ESP32 and visualized on a computer using Processing software, mimicking a radar display.
It’s a great example of how embedded systems can be applied in robotics, automation, or even DIY projects.

Components Used
All key hardware in this demo is available from Pacific Custom Engineering:
- ESP32-WROOM-32 Development Board (5V, Type-C, CH340C, WiFi/Bluetooth, ultra-low power) – The brain of the operation, handling sensor data and communication.
- HC-SR04 Ultrasonic Sensor – Provides accurate distance measurements.
- USB Charging Data Cable with 540° Rotation and Magnetic Tips – Ensures reliable powering and programming.
How It Works
- Connect the HC-SR04 sensor to the ESP32 via the folowing GPIO pins:.
- #define TRIG_PIN 23
- #define ECHO_PIN 22
- #define SERVO_PIN 26
- Upload the Arduino sketch (ESP32-radar.ino) to the board.
- Run the Processing sketch (ESP32-radar-processing.pde) on your computer to receive serial data and render the radar interface.

The ESP32 reads distance values from the sensor and streams them to the PC via serial/COM port, where Processing creates a dynamic visual representation.
Check Out the Demo VideoWatch the radar in action in our short demo video. It highlights the seamless integration of our components for real-world applications.
Interested in building your own?
Head over to the GitHub repository for the full code and get started with our components today!
For more details or to purchase components, visit Pacific Custom Engineering LLC.
#ESP32 #Arduino #IoT #Automation #MakerProjects #PacificCustomEngineering